Full Tutorial on the Best Way to Build Single Page Apps in React with Database Backend
Single Page Applications (SPAs) are widely used these days, and front-end developers have their choice of frameworks to use when designing them. React is one of the more popular options available; its component-based architecture allows for easy re-use of UI elements, and its virtual DOM rendering approach gives it an edge in performance when compared to other frameworks like Angular.
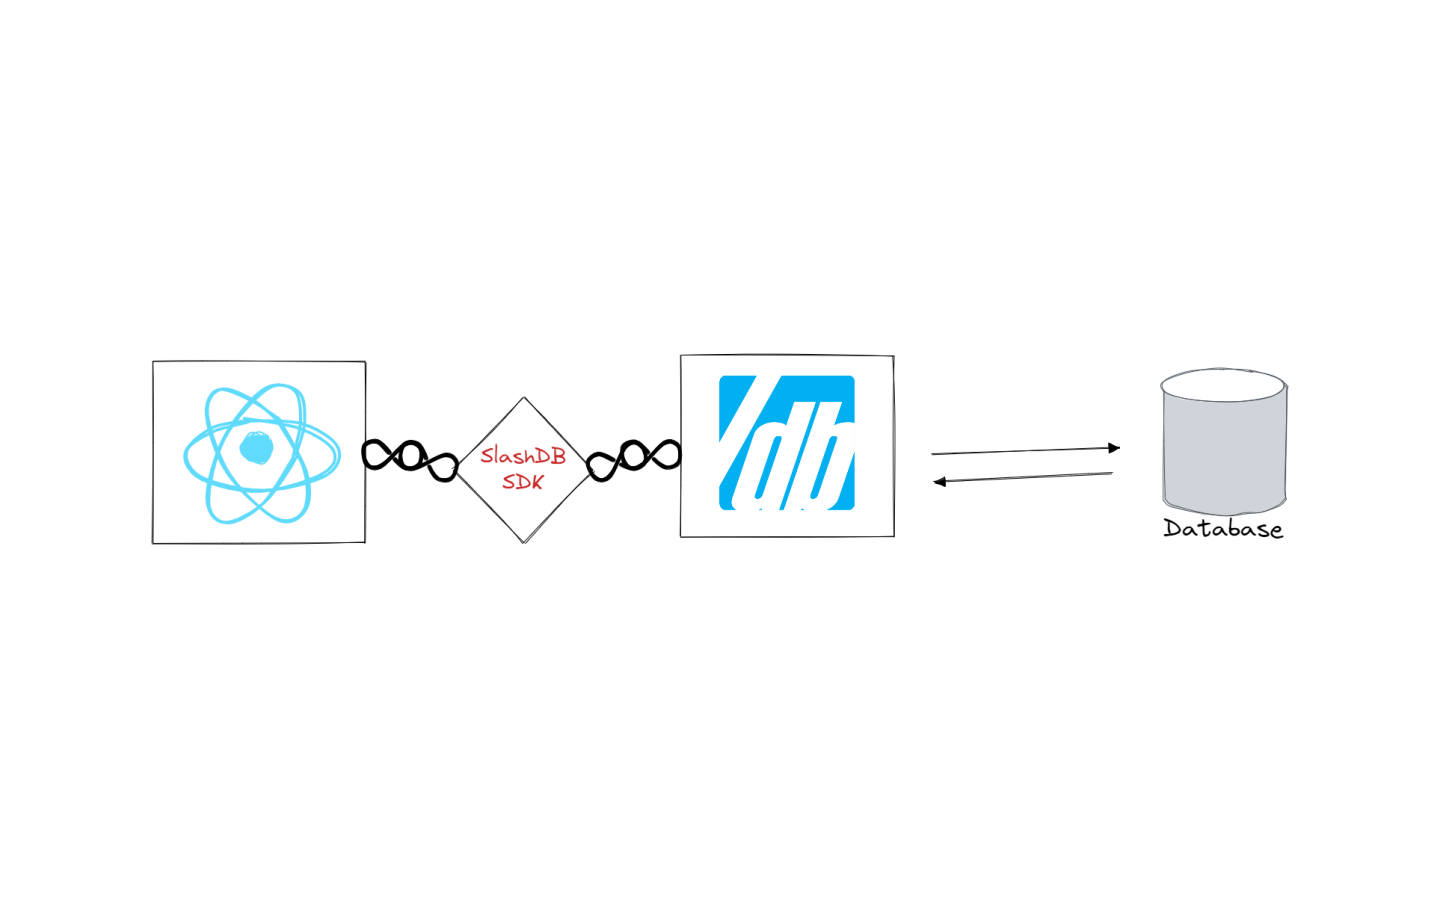
But, an SPA will typically need access to a persistence layer of some kind to store data. Many developers opt for SQL solutions, and these will typically require an API of some kind to retrieve and update data in the database. SlashDB takes care of this API for developers, freeing them to focus on other coding challenges.
In this blog post, we’re going to demonstrate at how quick and easy it is to create a simple SPA using React, SlashDB React SDK and an SQL database.
Example SPA app similar to Google Keep, with source code
The SPA is a task list app, similar in function to apps like Google Keep. You can obtain a working copy of the demo app at https://github.com/SlashDB/taskapp-demo, along with setup instructions. You can find the SlashDB React SDK on GitHub at https://github.com/SlashDB/react-slashdb, or install it directly from the NPM repository at https://www.npmjs.com/package/@slashdb/react-slashdb.
We’ll show you how the SlashDB React SDK was used to create this demo app, giving you a roadmap to quickly create your own SPAs that leverage SlashDB.
The task list app allows users to:
- create and delete task lists
- add/remove/mark completed tasks in each list
- see the percentage of tasks completed in each list
- store task items in a SQL database for persistence
The React SDK provides methods that allow:
- setting up a connection to a SlashDB instance
- basic authentication using an API key or username/password
- CRUD operations on the SlashDB-enabled database using some custom React hooks
Let’s examine some of the components in this demo app to learn how we can use these methods. Note that this isn’t a React tutorial; if you need to brush up on your React terminology, you can start here.
Connecting to the SlashDB Server Using the SlashDBProvider Component
In order to make use of a SlashDB server in our SPA, we need to establish a communication channel between the app and the server. The SlashDBProvider component in the SDK, combined with a .env file, allows us to set that up.
In our index.js file, we’ll pass parameters set in the .env file to the SlashDBProvider component as props. The SlashDBProvider uses a React Context object to share configuration parameters between components. If you’re connecting to SlashDB with a username/password, set the appropriate variables in the .env file; if you’re using an API key, set the appropriate variable as well as the username variable. The username must correspond to a valid user in the SlashDB configuration. Below is the code used in the demo app:
import { SlashDBProvider } from '@slashdb/react-slashdb';

ReactDOM.render(
  <HashRouter basename="/">
  <SlashDBProvider
    baseUrl={process.env.REACT_APP_SLASHDB_SERVER_URL}
    setUpOptions={{
      username: process.env.REACT_APP_DATABASE_USERNAME,
      //password: process.env.REACT_APP_DATABASE_PASSWORD,
      apiKey: process.env.REACT_APP_USER_API_KEY,
    }}
  >
    <App />
  </SlashDBProvider>
 </HashRouter>,
document.getElementById('root')
);
Note that our <App> is wrapped by the SlashDBProvider so that child components have access to the context object.
App Skeleton and SlashDB Authentication
Onto the App.js file. We create the app skeleton– note that we’re using the react-dom-router module. We also need to handle authentication to the SlashDB server. We also have our first SlashDB React SDK hook here, useSetUp. We call this hook to get access to the SlashDBProvider configuration that we set up before; this hook always needs to be used at least once before using any other SDK hooks. We’ll see it again shortly.
The ProtectedRoute component contains some logic to make sure that the user has been authenticated, using the SDK-provided Auth class. Assuming authentication is successful, it renders the ListApp component.
import { useSetUp } from '@slashdb/react-slashdb';

function App() {
  useSetUp();

  return (
   <div>
    <Header />
    <Switch>
     <Route exact path="/" component={Login} />
     <ProtectedRoute exact path="/app" component={ListApp} />
    </Switch>
   </div>
  );
}
The Login component brings in the SlashDB configuration (hostname, username, API key/password) from the SlashDBProvider component by calling the useSetUp custom hook. useSetUp returns a special client object that will contain the config, which we pass onto the login method of the Auth class – we can login to our SlashDB instance now (n.b. if you’re using an API key, you don’t need to use the Auth class methods, they are for password-based logins). The authentication function in the Login component is quite simple:
import { useSetUp, auth } from '@slashdb/react-slashdb';

export default function Login(props) {

  const [username, setUsername] = useState(
    process.env.REACT_APP_DATABASE_USERNAME
  );

  const [password, setPassword] = useState(
    process.env.REACT_APP_DATABASE_PASSWORD
 );

  const sdbClient = useSetUp();
  const handleSubmit = (event) => {
      // username and password are provided in a form component, this way you can override the .env defaults if desired
      auth.login(username, password, sdbClient, () => {
        props.history.push('/app');
      });
      event.preventDefault();
  };
With the app skeleton and the authentication steps handled, we can move on to retrieving the task list data from the database.
Adding New Task Lists and the Task Lists Container
The ListApp component rendered by our ProtectedRoute in turn renders two child components – NewListArea and Lists. NewListArea is the component we use to create a new task list. Lists is a container for the task lists that exist in the database. These components need a way to perform operations against the database via SlashDB; the SDK provides a couple of custom hooks to do just that.
The useDataDiscovery hook provides access to the Data Discovery features of SlashDB. It takes three parameters: the database name, the resource name, and optionally a filter to apply to the resource. A filter can look something like this:
FirstName/Joe/LastName/Camel
For more on filters, see the SlashDB documentation. The hook returns an array that holds the requested data from the database, as well as four function references which can be used to perform GET, POST, PUT, and DELETE requests with the provided database. Let’s examine the code in ListApp:
import { useDataDiscovery, auth } from '@slashdb/react-slashdb';

export default function ListApp(props) {
  const [lists, getList, postList, putList, deleteList] = useDataDiscovery(
    process.env.REACT_APP_DATABASE_NAME,
    'TaskList'
  );
...
  <NewListArea makeNewList={postList} getLists={getList} />
   {lists && (
    <Lists
      lists={lists}
      getList={getList}
      putList={putList}
      deleteList={deleteList}
  />
Here, the useDataDiscovery hook is given the name of the database as set in the .env file, and the TaskList resource, and no filter is given – in other words, we want to retrieve all records in the TaskList table, with all columns. The records are stored in the lists array. The function references that are returned get passed along to the NewListArea component so that new lists can be created, and onto the Lists component, which will pass them onto its child components.
Here’s how NewListArea will use the postList prop (renamed to makeNewList in this component) that was passed down:
export default function NewListArea(props) {
const { makeNewList } = props;
const [listName, setListName] = useState('');
...
  <input
    style={inputStyle}
    value={listName}
    placeholder="New List..."
    onChange={(e) => setListName(e.target.value)}
  />
  <button
    style={buttonWrapper}
    onClick={() => {
      makeNewList( { Name: listName ? listName : 'New List', } );
      setListName('');
    }}
  >
   Add list
  </button>
We provide a name for the new list in the input field, and when the Add button is clicked, the makeNewList function is triggered, with the name of the new list provided – this will call the SlashDB API behind the scenes to add the new list to the TaskList table.
Our Lists component is just a container for task lists; we map over lists and generate a List component for each one, providing the function references as props, along with the task list record IDs:
<div style={wrapper}>
  {lists.map((list) => (
   <List
     key={list.TaskListId}
     TaskListId={list.TaskListId}
     list={list}
     getList={getList}
     postList={postList}
     putList={putList}
     deleteList={deleteList}
   />
 ))}
</div>
Task Lists
Let’s move onto the two components in this app that contain user data. First we’ll talk about List.
We import the useDataDiscovery hook, the useExecuteQuery hook, and a couple other items – we’ll look at these in a minute. The List component receives some props that contain each task list ID, as well as the function references to perform operations on each list:
import { useDataDiscovery, useExecuteQuery } from '@slashdb/react-slashdb';
import { DataDiscoveryFilter, SQLPassThruFilter, eq } from '@slashdb/js-slashdb';
const List = (props) => {
  const { TaskListId, list, getList, postList, putList, deleteList } = props;
We’re going to make use of some functions from the SlashDB JavaScript SDK to create the filter parameters for the hooks. DataDiscoveryFilter is used to create SlashDB-compatible filters for the useDataDiscovery hook, and SQLPassThruFilter creates filters for the useExecuteQuery hook that we’ll be looking at shortly. These aren’t required to create an app (you can build filters yourself), but they can make your life easier if you’re new to SlashDB. We’ll be using these filter parameters in a couple more function calls later in this code.
We run the useDataDiscovery hook again, this time to retrieve data about the specific tasks in each list. We set TaskItem as the resource, and provide the DataDiscoveryFilter object as a parameter to ensure we only retrieve data for the tasks that are associated with the given task list.
const taskListIDPath = new DataDiscoveryFilter(eq('TaskListId',TaskListId));
const queryParams = new SQLPassThruFilter({'TaskListId':TaskListId});

const [tasks, getTasks, postTask, putTask, deleteTask] = useDataDiscovery(
    process.env.REACT_APP_DATABASE_NAME,
   'TaskItem',
   taskListIDPath
 );
We get back our array of task items in the tasks constant, as well as function references to perform operations on each item. We map over the task items and create Task components for each of them, passing the function references down as props for Task to use:
{tasks.map((task) => (
 <Task
   key={task.TaskItemId}
   task={task}
   getTasks={getTasks}
   putTask={putTask}
   deleteTask={deleteTask}
   executeMyQuery={executeMyQuery}
 />
Still in the List component, we’ll be making use of the deleteList function and the deleteTask functions, which are called when removing a list. Here’s the delete button for each list:
<button
  style={removeButtonStyle}
  onClick={async () => {
   if (tasks.length > 0) {
     await deleteTask(taskListIDPath);
  }
    await deleteList(taskListIDPath);
 }}
 >
  Delete
</button>
When we delete a list, the deleteTask function is called first, to delete any task items in the list. Then the deleteList function is called to delete the list itself. Notice the argument that we provide to the deleteList function is the taskListIDPath filter that we created previously.
To add a new task item to the list, we call the postTask function, with some key/value pairs to specify the item name and the task list that the item will belong to:
<button
  style={addButtonStyle}
    onClick={async () => {
     await postTask({
       Task: task ? task : 'new task',
       TaskListId: list.TaskListId,
       Checked: 0,
     }).then(() => {
       executeMyQuery(queryParams);
    });
    setTask('');
  }}
 >
 Add
</button>
Now let’s look at the useExecuteQuery hook. This hook is used to execute queries that have been previously created in the SlashDB administrative control panel. See the SlashDB documentation for more on SQL Pass-Thru. For the demo app, there is already a query created named percent-complete on the demo SlashDB instance. It calculates the percentage of task items in a task list that have their Checked column set (i.e. the task items that are marked as complete):
const [queryData, executeMyQuery] = useExecuteQuery(
  'percent-complete',
  queryParams
);
To use the useExecuteQuery hook, we provide the name of the query we want to use, and the SQLPassThruFilter object that we created previously (we can also provided a JavaScript object of key/value pairs with parameter names and values). The percent-complete query takes a parameter named TaskListId. The hook returns an array containing the query result (queryData) and a function reference to execute the query on demand (executeMyQuery).
In the List component, we store the results of the query in the queryData constant. Then we display the value at the top of the List:
{tasks.length !== 0 && (
 <p>Completed tasks {queryData[0].Percentage} %</p>
)}
Task Items
Lastly, we’ll examine the Task component. Remember that in the List component, each Task was provided props that held the task item itself, and function references for updating the task item in the database. We also include the function reference for the percent-complete query, which we’ll call in this component. Let’s use the SlashDB JavaScript SDK to create some filters (again, these are optional but useful). The taskIDPath constant is the path to the Task item in SlashDB, which we’ll need when we call any of the get/put/delete functions:
import { DataDiscoveryFilter, SQLPassThruFilter, eq } from '@slashdb/js-slashdb';

const Task = (props) => {
  const { task, getTasks, putTask, deleteTask, executeMyQuery } = props;
  const taskIDPath = new DataDiscoveryFilter(eq('TaskItemId',task.TaskItemId))
  const queryParams = new SQLPassThruFilter({'TaskListId':task.TaskListId});
Each Task has a Name component which can be modified using the putTask function. The execution of this function is handled inside the Name component, which we won’t cover here:
<Name
  style={{
   textDecoration: task.Checked ? 'line-through' : 'none',
   fontSize: '1rem',
   height: 'auto',
   margin: 'auto',
 }}
 fieldName="Task"
 fieldValue={task.Task}
 update={putTask}
 location={location}
></Name>
We set up the mark complete checkbox like so:
<input
  style={checkStyle}
  type="checkbox"
  checked={task.Checked}
    onChange={() => {
      putTask(taskIDPath, {
      Checked: !task.Checked,
    }).then(() => {
      executeMyQuery(queryParams)
    });
 }}
></input>
When the checkbox changes, the putTask function is called to update the task item’s Checked column in the database, and then the executeMyQuery function is called to update the List component’s completed tasks value. Finally, we have a delete button that triggers the deleteTask function when clicked, and executes the query again:
<button
  style={removeButtonStyle}
  onClick={() => {
    deleteTask(taskIDPath).then(
      () => {
        executeMyQuery(queryParams);
      });
    }
  }
>
Conclusion
We’ve covered all the important functions in the React SDK that you’ll need to get up and running with your own SlashDB-driven SPA – configuration, authentication, data retrieval, and data manipulation. The components and hooks provided in this SDK will streamline your React development process, and SlashDB will take care of generating a fully functional API for your data model.[/vc_column_text][/vc_column][/vc_row]